❗ Feel free to skip the fluff and navigate directly to the raw Meeting Note template.
UPDATED FEBRUARY 2024. Updated guide to use Meta Bind plugin to trigger the creation of a new meeting note, instead of the rarely-updated Buttons plugin.
Also, this tutorial is now available as a YouTube video! Watch 🗣 Obsidian Meeting Note Template Tour and Tutorial to see me set up this system from scratch.
Obsidian is the perfect place for meeting notes. With the right type of organization and template, you’ll be able to instantly take notes at the click of a button, and then have those notes available to you whenever you need them.
I’ve written in detail about my Obsidian Daily Note Template as well as my People Note Template. But these are only 2/3rds of the trifecta, with Meeting Notes forming the final piece of my productivity puzzle.
I designed this Meeting Note system with the following criteria in mind:
- Ability to just as easily create notes ahead of time for pre-meeting planning, or instantly in-the-moment for ad hoc meetings
- Every note needs space for both the date of the meeting and who attended
- There should be designated space for an agenda (pre-meeting planning) and meeting notes
- Meeting notes should be easily1 accessible in multiple contexts2
I’ve developed both a Meeting Note template as well as a system that satisfied all the above criteria for me. I wanted to share it, because maybe it’ll work wholesale for you. Or maybe you’ll be able to pick and choose individual pieces that fit into your existing workflow.
The big meeting-note picture
When you want to create a new meeting note page, you click Command-O and type “Meetings.” Select your Meetings MOC to open it.3
On that page, click the New Meeting button to create a new meeting from your Meeting template. The new note will already include today’s date in the title (which you can edit if the meeting is in the future/past) and will automatically move to the correct directory.
You immediately change the title of the meeting note, and jot down any pre-meeting agenda items in the existing Agenda section.
At the beginning of the meeting, make sure you write down everyone’s names in the Attendee section. Put double brackets around the important names to either link to an existing People page for that person, or remind yourself to create a new People page later.
During the meeting, take notes in the Notes section. Next actions can go in the dedicated Next Actions section.
Once the meeting is complete, make sure you enter a short summary in the YAML section of the note, to make this meeting easier to find later. Process the note (filing away important information, adding action steps into another system) as necessary.
Set up
These are the plugins you’ll need:
You’ll want to install the plugins directly through Obsidian.
Additionally, there are two separate pages that make this system work: a Meeting MOC page, and the actual Meetings Template page.
❗ Feel free to jump directly to the Obsidian Meeting MOC template or the Obsidian Meeting Note template if you don’t need any of the supplementary setup help.
Directory Organization
First, let’s take a look at my directory organization as it relates to timestamped notes:
Timestamps/
├── 2021/
├── 2022/
├── 2023/
├── Meetings/
│   ├── 🗣 Meetings MOC.md
│   ├── 2023-10-25 meeting title.md
│   ├── ...
├── +Daily Notes.md
The Timestamps directory contains both meeting notes and Daily Notes, but this post will only cover meeting notes. I’ve done a deep dive into my Obsidian Daily Note in the past, so please refer to that for more info if you’re interested.
Within the Timestamps directory, I have a top-level Daily Note MOC called +Daily Notes and several sub-directories of years that contain all of these daily notes. Additionally, within Timestamps, I have a Meetings directory, which contains its own MOC called 🗣 Meetings MOC, and all those meeting notes live within the top-level of that Meetings directory.
You’ll also notice certain naming conventions that help me tell different file types apart at quick glance. All of my MOC files start with an emoji or special character — in this case either 🗣 or +. Meeting filenames all start with a date followed by the meeting titles.
Emojis come before numbers when viewing files alphabetically, which means that this naming convention will always show your MOC file above your meeting notes files in the left-side file browser panel.
The meeting note naming convention ([date] [meeting title]) is automatically created by the Templater template we’re using.
The “meeting title” is usually three or four words that describe the meeting at a super high level (like an email subject). This is separate from a meeting summary, which should be longer, and is part of the YAML in each meeting note.
Meetings MOC
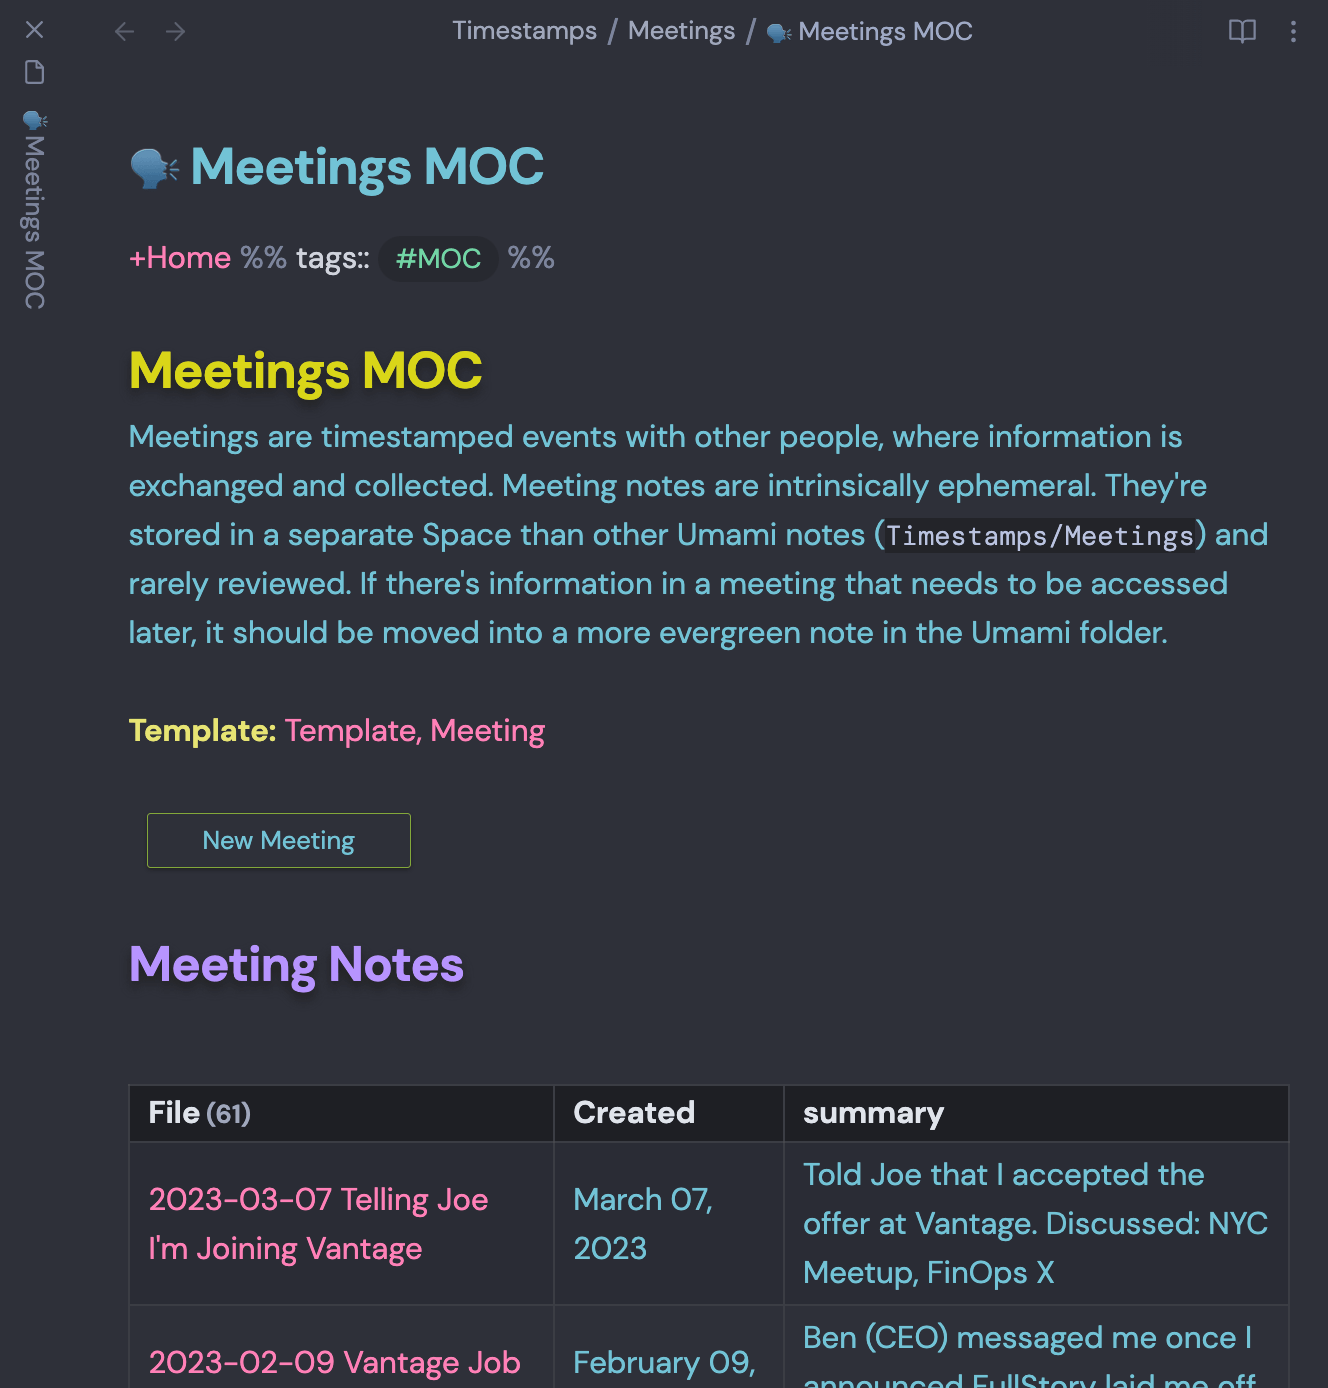
My Meetings MOC is fairly simple, with three specific things I use:
- A filename with an emoji (
🗣 Meetings MOC) so it’s alphabetical in the directory and easy to find at-a-glance - A Meta Bind button to create new Meeting notes from my template
- A Dataview list of all my meeting notes, with date and summary
I’ve added my full Meetings MOC file to Github for people to borrow and lift for their own use, with a few caveats:
- Your meeting note template (which we’ll create below) will need to be named
Template, Meeting, or else you’ll need to update this note so that it links to your actual template - Copying and pasting the Button code may not work. You should instead use the actual Button Builder function of the Meta Bind plugin.
- For the Dataview table to work, your meeting notes will need to be located in the
Timestamps/Meetingsdirectory. If you use a different directory, update the Dataview query to reflect your path.
Quick Note: Title vs Summary
In our 🗣 Meetings MOC file, we’ll build a Dataview table that shows the filename, created date, and a short summary. Some of this data is redundant (the filename contains the date, so a separate column for Created Date is unnecessary) but this is how I like it. Feel free to modify the Dataview table for your needs.
Likewise, the Dataview table shows two separate descriptions of the meeting: the filename (Title) and the summary. These might seem redundant, but have the potential to be powerful. When naming your meeting notes, and writing your summaries, think of the Title as an email subject, and the summary as a tl;dr. It makes browsing your meeting notes via the 🗣 Meetings MOC page a breeze.
Meeting MOC Dataview Table
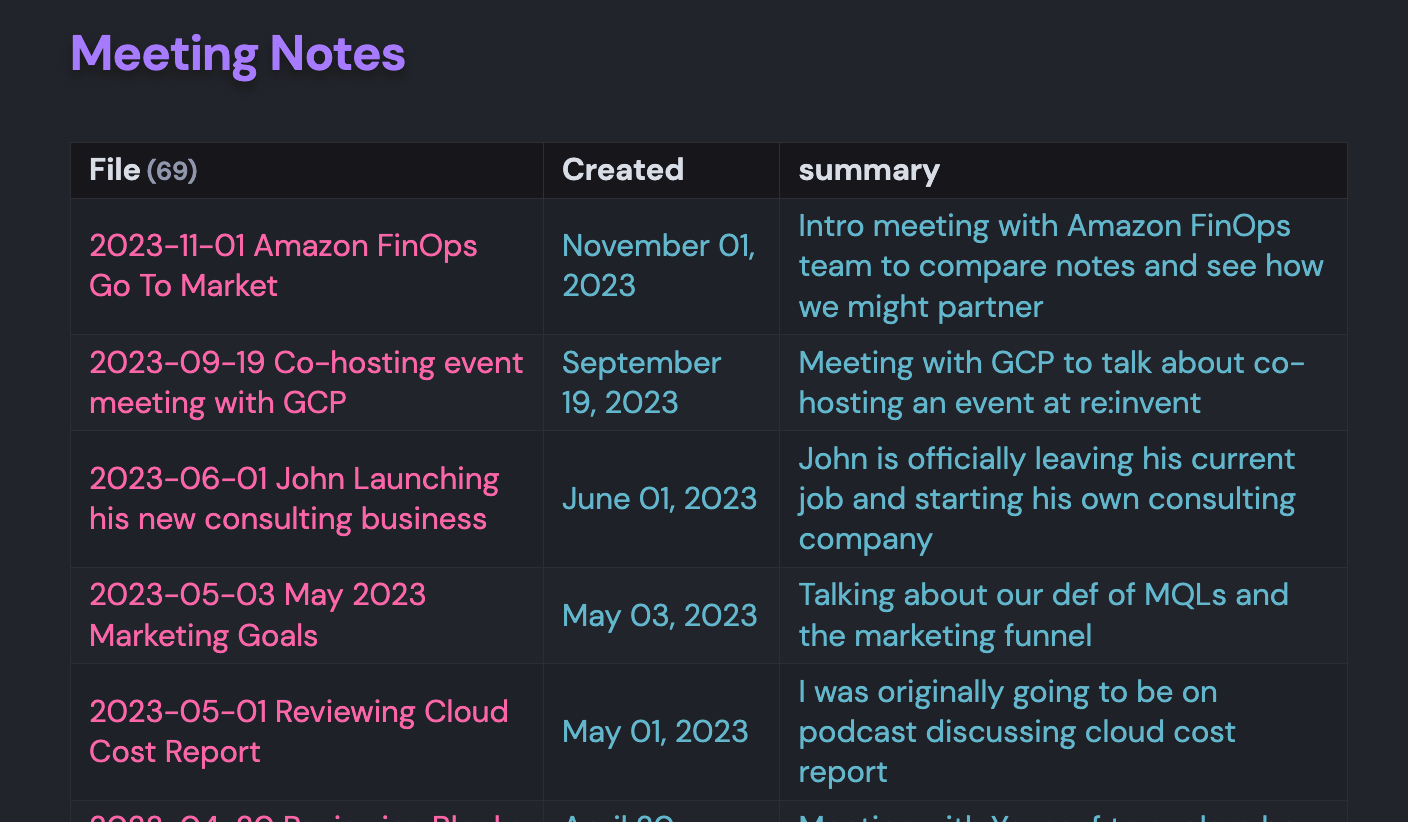
On the 🗣 Meetings MOC page, we want a button to create a new Meeting Note (described below) and a table of all our meeting notes for easy browsing. We’ll create that table using Dataview.
Check out the Meetings MOC to see the full code block. Essentially, what this renders to is a table of all your notes, with three columns (File, Created, summary) in order from most recent to least.
Creating New Meeting button
I like being able to create a new meeting note by clicking a button directly on the Meetings MOC page.
In order to create the button on the Meetings MOC page, you’ll need to create the template first. So for now, create the Meetings MOC page, in the designated directory, and leave the button section blank. We’ll come back and create the button after we’ve created the template.
Meeting Note Template
This Meeting Note is designed to be created at the beginning of a meeting. This is a personal preference for me, as I’ll click the button to create the meeting note and start filling in details while everyone is saying hello in the first few minutes. You might want to create a Meeting Note before a meeting, taking time to fill in metadata and prepare for the conversation. Others still might create the Meeting Note after a meeting — taking notes on a blank page during the meeting, and then organizing everything after-the-fact. You should make adjustments to the template as needed to optimize for your preferences.
Most of the time, I’m hopping into a Zoom call or jumping into a conference room, and then creating this note. Because this is my preferred workflow, this template is designed to automate essential metadata, and create the structure that I need to immediately start using the note.
Let’s walk through the template, line by line.
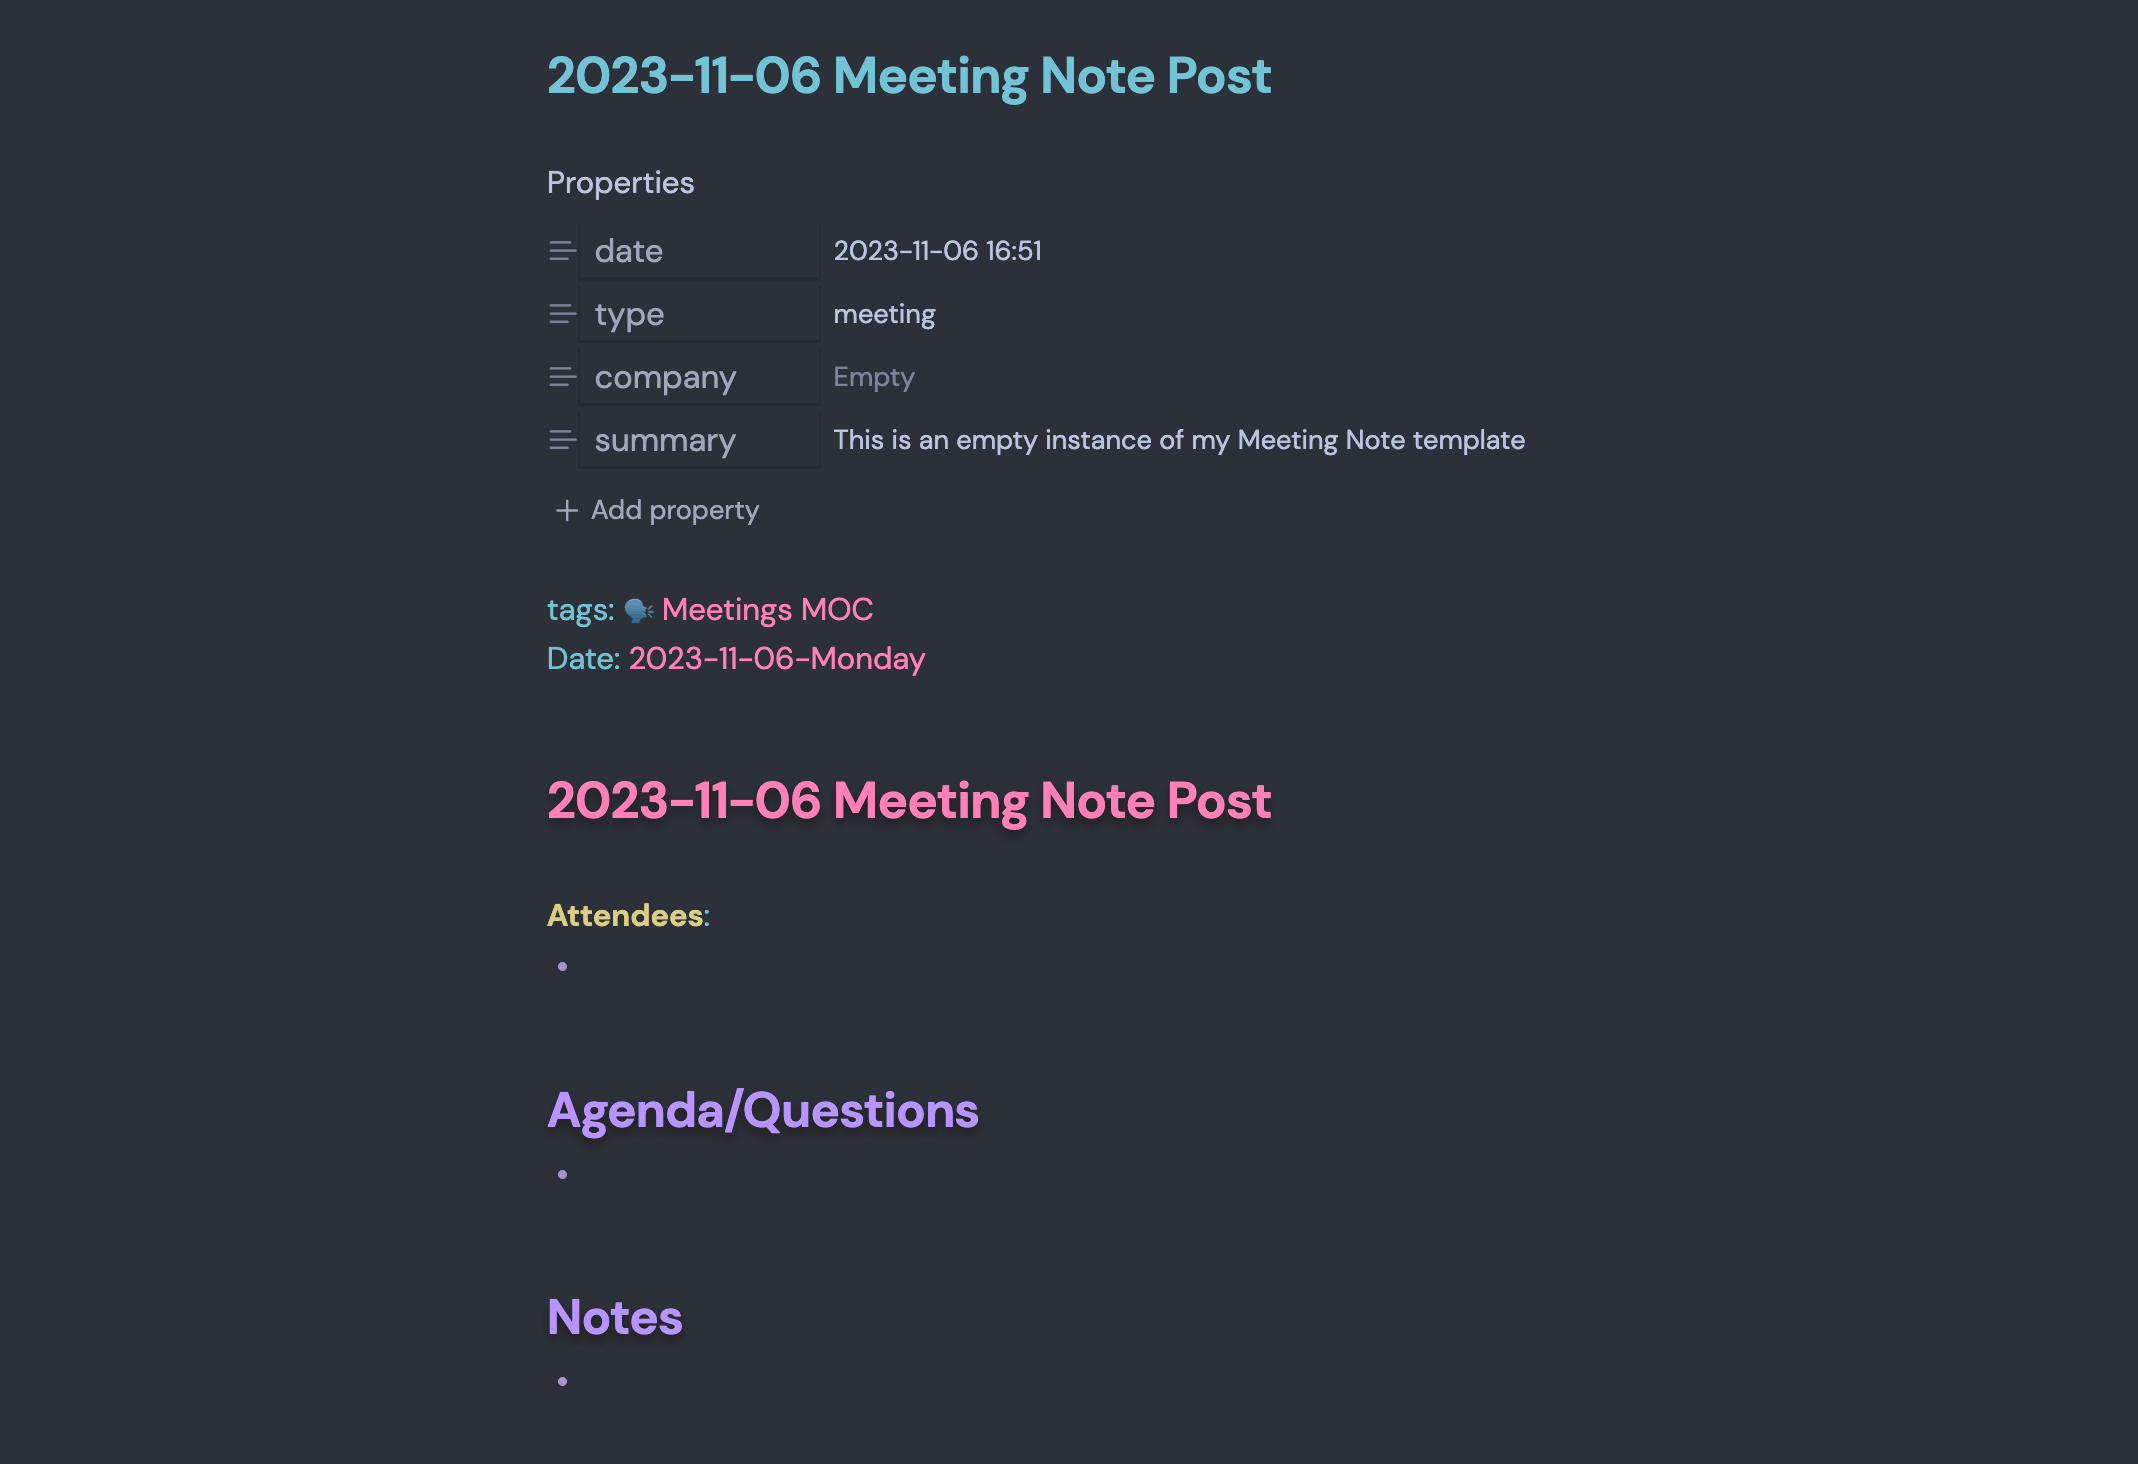
---
date: <% tp.file.creation_date() %>
type: meeting
company:
summary: " "
---
At the top of the note is the metadata. This will help us sort and organize our notes. What’s more, this metadata automatically transforms into the new Properties feature of Obsidian. If you format your template like this, it will automatically turn into Properties when the note is created.
A few things of note:
The code date: <% tp.file.creation_date() %> is used by the Templater plugin to insert the date and time that the note is created into this document.
I include type: meeting in the metadata as well, although I don’t actually use this field at all. When I first created this template, I thought it might be useful to distinguish between different types of meetings (one on ones, sales, personal) but didn’t end up implementing this.
In the company field, I typically link to my company’s MOC page if the meeting is related to work. Then, on my company’s MOC page, I include a Dataview table that shows all meetings related to my company.
Then, outside the metadata:
tags: [[🗣 Meetings MOC]]
Date: [[<% tp.date.now("YYYY-MM-DD-dddd") %>]]
<% await tp.file.move("/Timestamps/Meetings/" + tp.date.now("YYYY-MM-DD") + " " + tp.file.title) %>
# [[<% tp.date.now("YYYY-MM-DD") + " " + tp.file.title %>]]
Let’s walk through what this is doing:
The only tag that’s default is the [[🗣 Meetings MOC]] tag, since that’s what identifies this note as a Meeting Note. When I’m setting up this note at the beginning of a meeting, I’ll add additional tags, such as my company (redundant), the company I’m meeting with, and the topic of the meeting (if applicable.)
You’ll also notice Date replicated here (it was also in the Metadata), but they’re actually two different things. In the metadata, it’s just date and time of note creation. Here, the date format, and the inclusion of brackets, means this note now links to that day’s Daily Note.
The following code (<\% await ... %>) does two things: moves the note into our Meeting directory, and renames the note in the proper format (2023-10-25 meeting title.md).
Finally, we’re creating an H1 tag (#) that links back to this page (notice the same filename format here as in the await code above). Making this H1 title a link to the page, rather than just text, means that when I change the file name, the H1 title will automatically update. This is quality-of-life formatting, rather than anything functional. But I find it incredibly useful.
And finally, there’s the meat of the note:
**Attendees**:
-

## Agenda/Questions
-

## Notes
-
There are three sections here, each pre-seeded with an initial dash (-) that formats to a bullet point. With these bullet lists pre-started, I can just click into any section and start typing.
First we have attendees. This is one of the sections that I fill in as soon as the meeting starts, when people are greeting each other. If I’m being really good, I’ll put every name in double brackets to link to that person’s unique People Note Page. If a person’s people page doesn’t yet exist, I’ll create it after the meeting (or not, depending on the person).
Next is Agenda/Questions. I’ll use this section throughout the meeting, adding details I want to discuss in the meeting, or questions that I have. These are all notes-to-self so I can make sure I remember the things I want to say in the meeting, while freeing my mind to actually listen to the things other people are saying.
Finally, Notes is where I take notes throughout the meeting. These are just your standard meeting notes: things I want to remember, notable comments, etc.
Pro Tip: There’s one section that I do not include in this template, but makes it into maybe 50% of my meeting notes: Next Steps. If there are any action items that are a result of this meeting, I’ll add this section below Notes and include both 1) the action item and 2) who is responsible for completing this item. Bonus points if you then move your action items into your Daily Driver Task Management System after the meeting. :)
Creating New Meeting button (continued)
Now that our Meeting Note Template has been created, we can make a button in our Meeting MOC file that creates a new meeting note for us. The cool thing about creating this button is that the button will both 1) create the new note using the template and 2) automatically run the Templater plugin code to fill in the dynamic metadata and move the note to the proper directory.
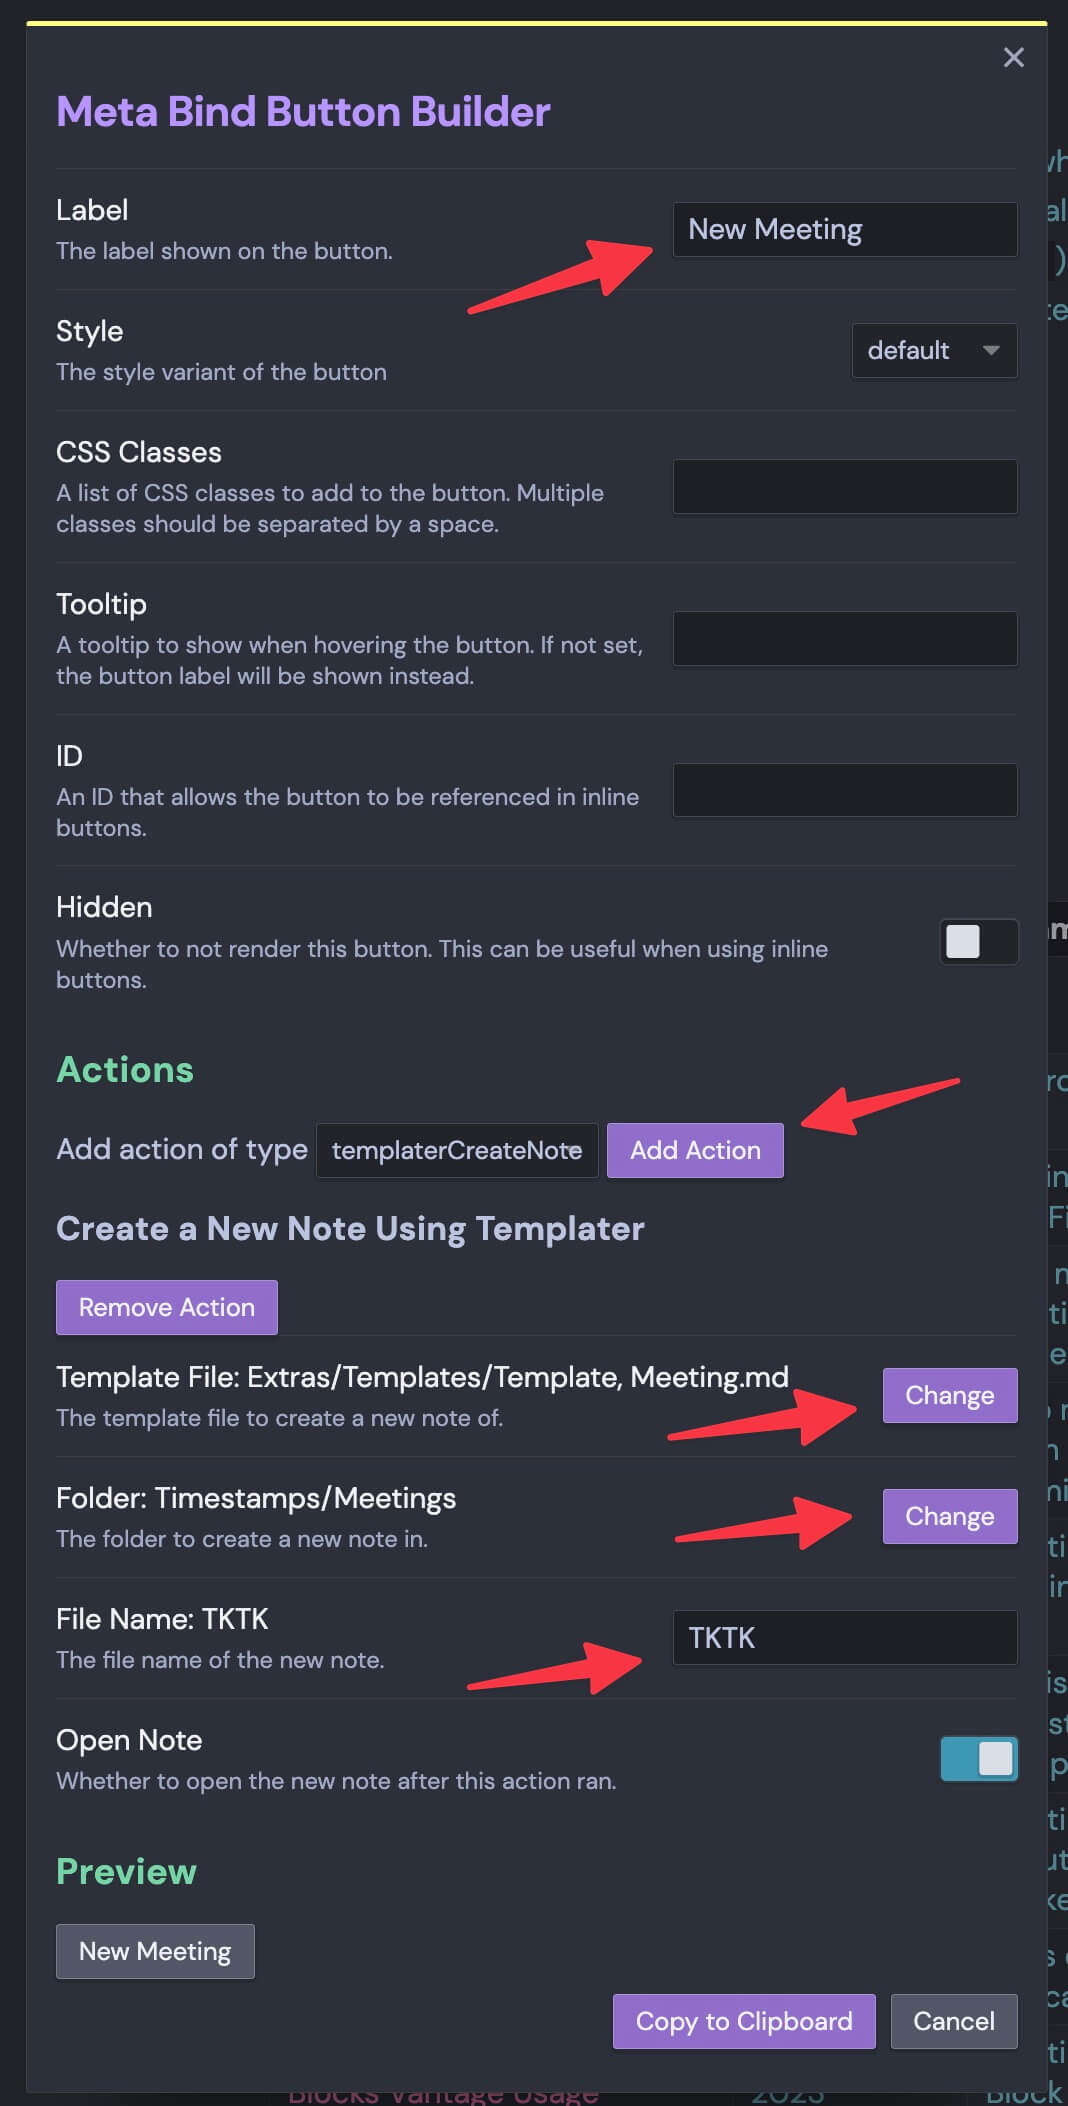
Here are the step-by-step instructions for making a Meta Bind button that will create a new meeting note and execute the template script:
- Navigate to your Meeting MOC file, and place the text insertion point where you want the button to go
- Press Command-P (Mac) to open the Obsidian Palette, type
Meta Bindand select “Open Button Builder” - For the Button Name field, type: New Meeting
- Under Actions, select
templaterCreateNoteand click Add Action - Next to Template File, click Change and select your template file (ie
Template, Meeting.md) - Next to Folder, click Change and choose the directory where you want your meeting notes (ie
Timestamps/Meetings) - For File Name, I use TKTK4 but you can use whatever you want.
- Click
Copy to Clipboardto close the modal, and paste the contents of your clipboard into your Meeting MOC note
When you paste the contents of your clipboard into your note, you’ll get a big code block. Click out of that code block, and it should automatically render your New Meeting button in place of that code.
Once you have your button, click it to test. If you did things correctly, it should create and open a new note, using the template you created with all the Templater code expanded.
Tip: If you’re getting a Templater parsing error when trying to create a new Meeting note, make sure you don’t already have a note with the same name, in the same directory, as the one you’re trying to create. This can happen if you’re testing the button multiple times without deleting or renaming the Meeting note you created.
You did it! Congrats.
Building Obsidian Habits
When trying to build a new productivity habit, it’s important to focus on two things: build your minimum viable system, and then iterate.
By this I mean: don’t get distracted spending hours upon hours trying to set up the perfect system to anticipate every single possible future need. Instead, get working minimal version of your system running, and then just start using it. Don’t be too precious about it. Then, iterate on this system, and change it as you go.
It makes more sense to copy this system wholesale, and then continue on with actual work. Then, when you have your next meeting, click the button, use the note, and then modify them template then based on your needs.
Productivity work is fun, and it feels like you’re doing work. But you’re not really doing work. You’re just futzing around. Try not to get so distracted by the system that you’re not doing any real work.
Liked this post?
Check out my other Obsidian posts:
- My Obsidian Daily Note Template
- My Obsidian People Note Template
- My Obsidian Physical Object System
- Recalling Books You’ve Read, Made Easy
Prefer video content? Check out the above video tutorial version of this post. It shows you exactly how to set up your own Daily Note template system.
If you’ve read this far, you might also really enjoy my free monthly newsletter. Each month, I share five cool new things I found. These can be products, articles, apps, movies, concepts, and anything else. Feel free to check out the archive to see if it’s something you might like, and subscribe to get each edition in your email.
Making notes easily accessible is the hardest part. When browsing through a lengthly list of different meeting notes, I’ve found that giving each meeting a summary is the best way to improve find-ability. ↩︎
Multiple contexts, for me, means that I can quickly find the meeting notes by person or by company. ↩︎
Alternately, you can type Command-P to open the command palate and create a new meeting note from there, but I like creating it from the
Meeting MOC(map-of-contents) page. It’s all a matter of personal preference. ↩︎“TKTK” is a an extremely useful writing tool I picked up from my years as a journalist. You should use it, too, if you’re not already! ↩︎