❗ Feel free to skip the fluff and navigate directly to the Physical Object Template or the Physical Object MOC template.
This tutorial is now available as a YouTube video! Watch 🛍️ Obsidian Physical Objects System and template to see me set up this system from scratch.
One of the most useful Obsidian systems I have is for tracking physical objects. It’s actually a system that I built slightly later than my others (such as my Daily Note, Meeting Notes, and People Notes). It’s also a system that largely fell into place over time, rather than being fully designed from the outset.
I think the reason that I had some resistance to this Physical Object system was because I didn’t feel like I needed an inventory of my stuff. I’m not a retail store, nor am I a minimalist (or aspiring minimalist) trying to keep track of every item I own.
It all started in early 2021 when I was in the market for a new television. Our one-bedroom, New York City apartment is decently sized, but not so big that it would support the largest-sized TVs available.
As I was doing research, I started using Obsidian as a way to keep notes and save reference articles and other links. I also had an existing TV, but it was a cheap model from Walmart, and I didn’t remember the dimensions or model. I looked these up and jotted the information down in Obsidian as well.
As I continued my research, I found myself tending my digital Obsidian garden—organizing and re-arranging notes as I go, rather than trying to build a perfect structure at the outset.
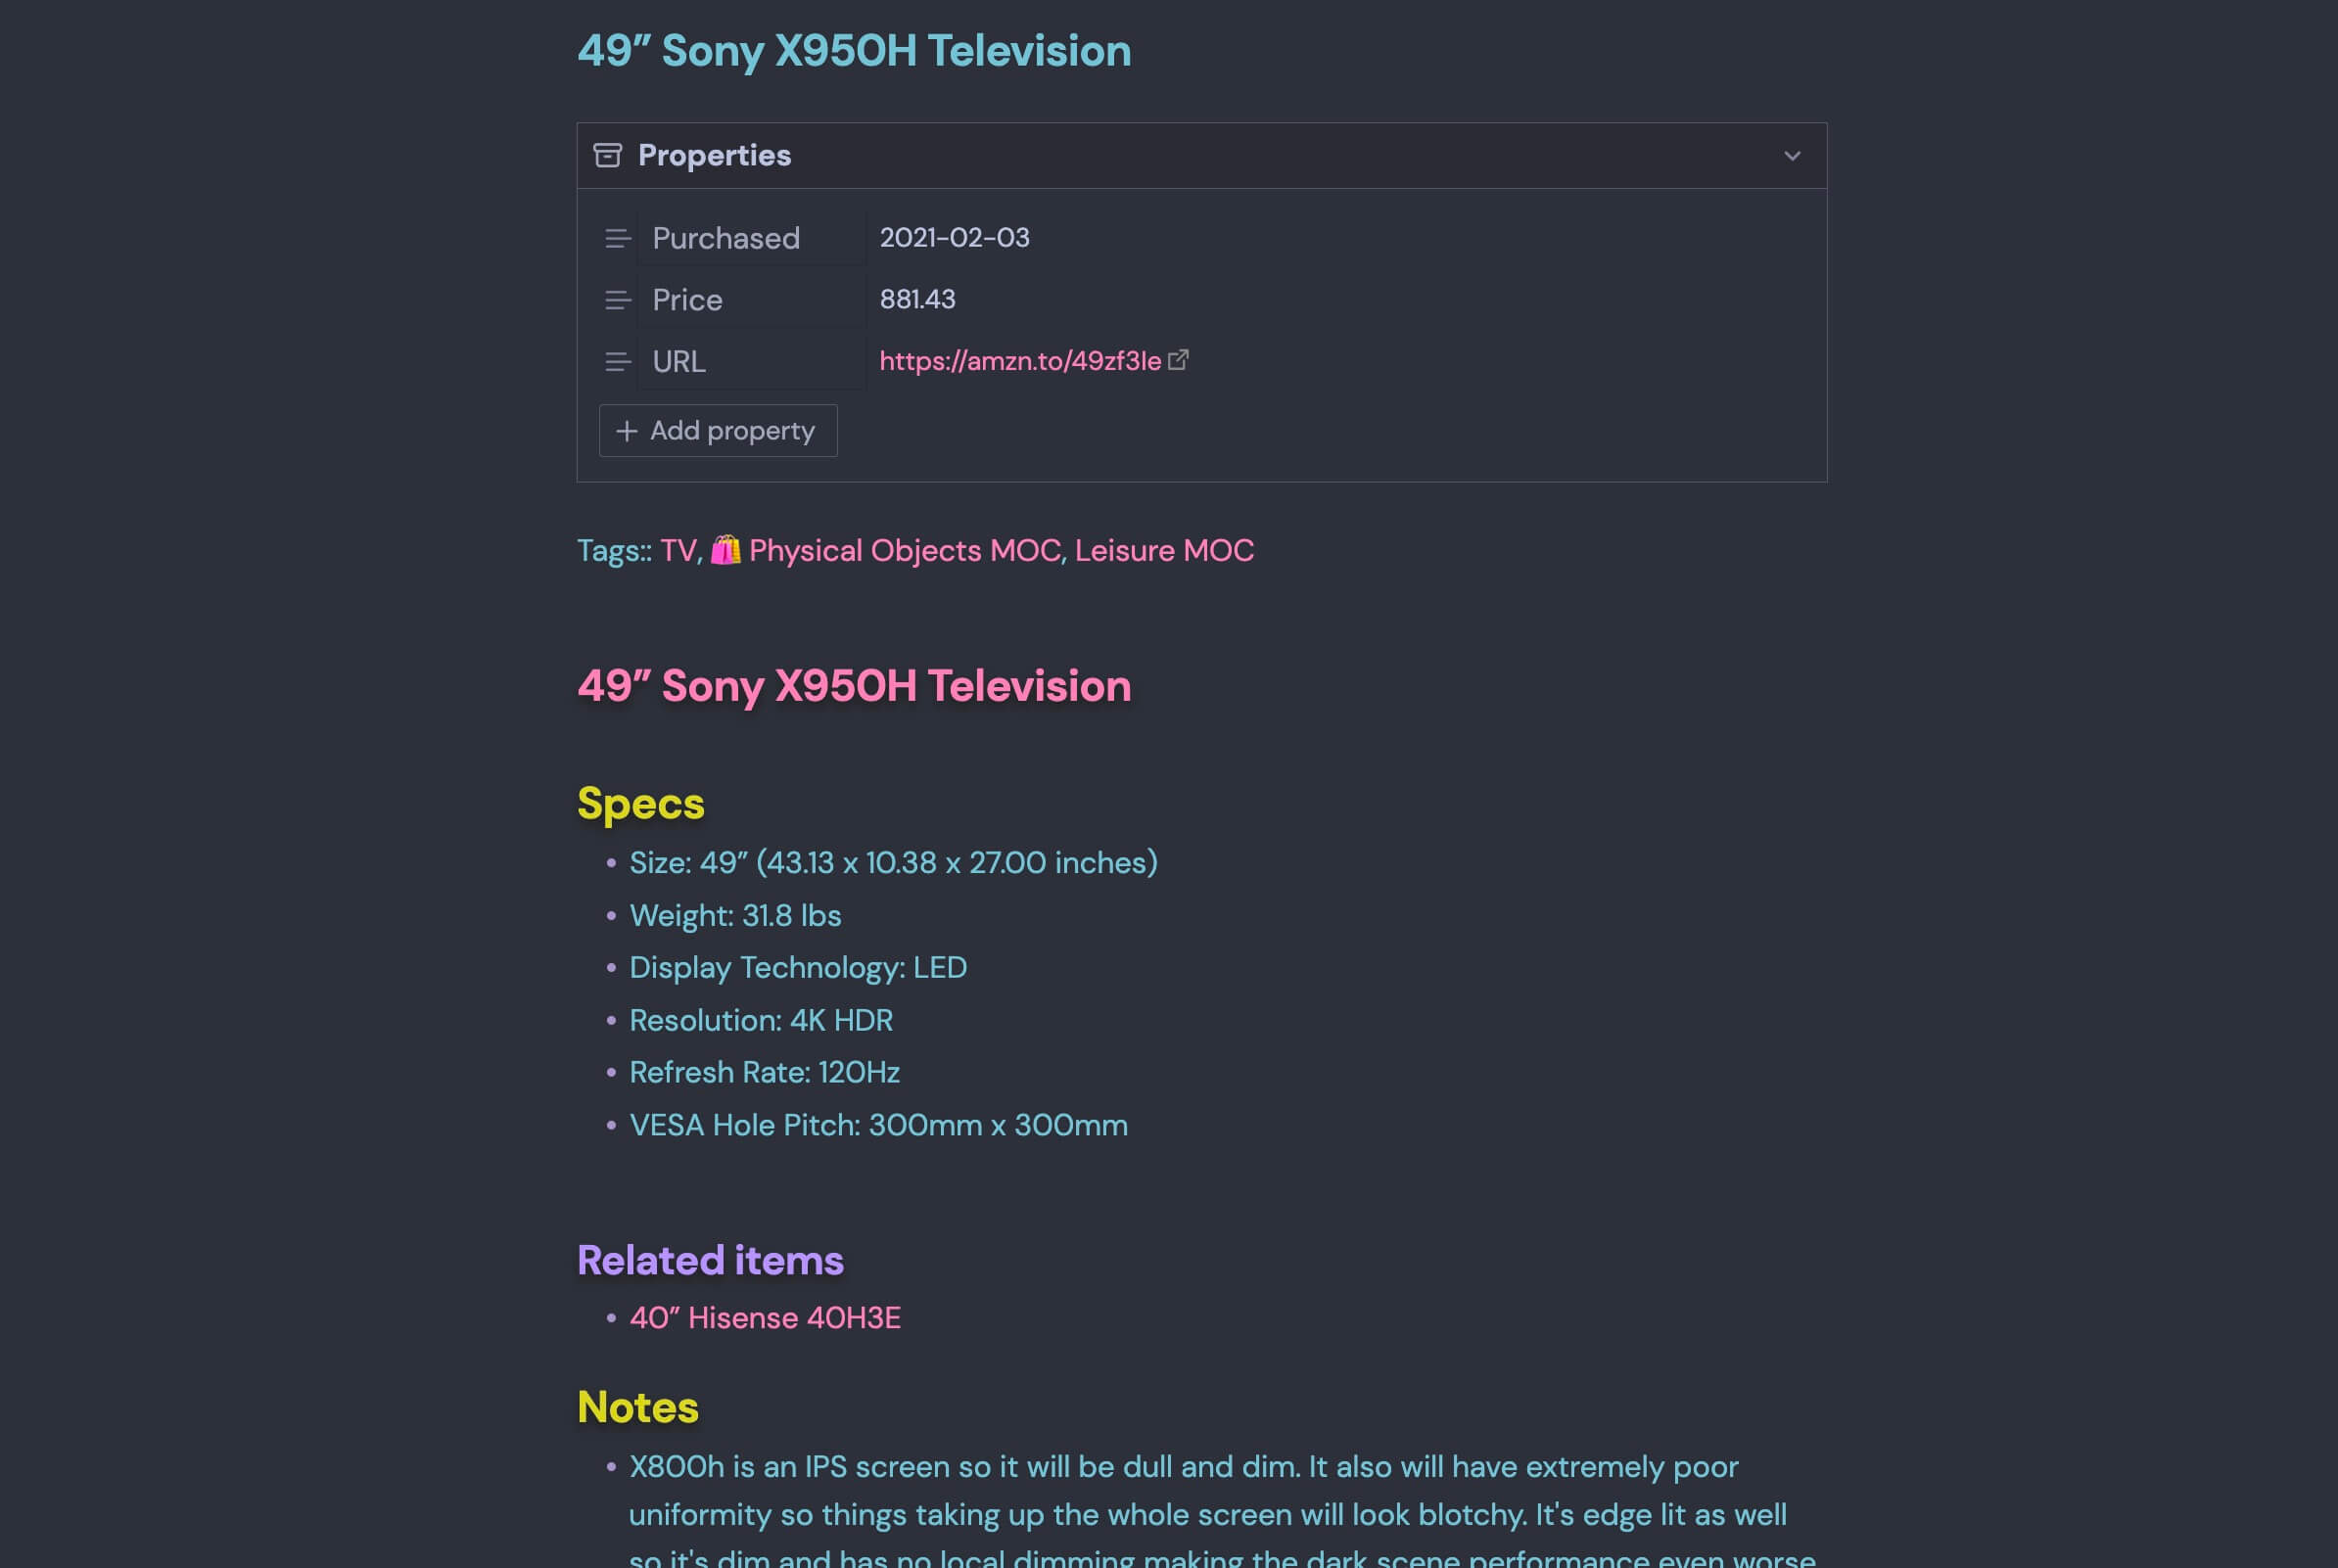
By the time I pulled the trigger on a television (the 49-in Sony X950H, in case you were wondering), I had a lovely formatted “physical object” note that I could use as the foundation for a new Physical Object template.
So that’s exactly what I built: the Physical Object Obsidian system outlined in this tutorial.
Designing the system
The goal of this Physical Object Obsidian system is to capture specific physical objects, not every physical object. I wanted a system to store objects where:
- Price or purchase date may someday be relevant
- There are item specs or dimensions I may need to reference one day
- The item has a specific model number you want to remember
- The object relates in meaningful ways to other objects or notes
- I had specific notes about the object I wanted to save (instructions, guidelines)
- I wanted to track how often all or part of an object needs to be replaced
Additionally, I decided to build this system around objects that I actually physically owned. Often, I’ll create a new Obsidian note when I’m researching a product or category. These notes are not stored in this Physical Object system. Once a purchase has been made, then I’ll create a Physical Object note for that item.
You may find that these guidelines work for you, or you may want to design your system slightly differently. Feel free to modify the Physical Object template file to fit your needs.
Implementing the system
There are three steps we’ll we taking to implement this system:
- Creating the new notes (Physical Object MOC & Physical Object template)
- Installing the proper Plugins
- Creating a button on the MOC to create a new Physical Object note from our template
In case you haven’t seen it before, MOC stands for Map of Content, and is taking from Nick Milo’s Linking Your Thinking. Basically, it’s a single note that ties together related notes, providing a map to that content in your database.
We’ll be creating a Physical Object MOC page that links to each of our physical object automatically (using Dataview). And each of our physical object notes will link back to this MOC.
Now, let’s walk through each of these steps one at a time.
Creating the new notes
Before creating your Physical Object MOC and Physical Object template, you’ll want to think about the directory structure that you want to use. For example, you may have an existing folder where you keep all your templates and a different one for all your MOCs.
For me, this Physical Object system touches three different directories:
Extras/
├── Templates/
MOCs/
Spaces/
├── Physical Objects/
If you don’t yet have these folders in your vault, create them now by right clicking (or control-clicking) in your Files sidebar and selecting New Folder. You don’t need to use the same directory structure as me, but if you use something different, make sure you review and update the templates and code blocks to match your system.
Create your Physical Objects MOC file
Inside your MOCs directory, create a new note. I like all my MOCs to start with an emoji, making it easier to recognize these special notes at a glance. If you want to follow my same naming convention, title this note 🛍️ Physical Objects MOC.
For the content of the note, you can copy and paste my MOC template from Github. This template is super simple: a tag linking it back to our +Home page (included on all MOCs), a header with the note name, a button to create a new Physical Object note from our template (ignore for now), a link to our template file, and a Dataview table listing all our Physical Objects (also ignore for now).
Create your Physical Objects template file
Next, we’ll create our Physical Objects template file. In your Templates directory, create a new note. Give this note a title—if you want to follow my naming conventions, then you should use Template, Physical Object.
Once again, you can just copy/paste the template content from Github, or modify it to better fit your needs.
Unlike our MOC file, this template includes Templater code that will dynamically execute when our note is created. This includes:
<% tp.date.now("YYYY-MM-DD") %>
Which replaces the code block with today’s date in the format of YYYY-MM-DD.
The other two code blocks give the file a new name (date + filename) and moves it to the correct directory location. This latter function isn’t necessary if you create new notes using the button we’ll create later in this tutorial, but I keep it there just in case I want to manually add and execute the template at some point.
Installing Plugins
There are three plugins necessary for this system:
- Dataview
- Templater
- Meta Bind
You’ll want to install these plugins directly in Obsidian. Open Obsidian Settings (the gear button on the lower lefthand side). Once there, click on Community Plugins and make sure Restricted Mode is disabled.
Click on the Browse button and search for the above apps. You may not even need to use the search function for Dataview and Templater—they’re so popular they may be at the top of the results already.
For each of these plugins, you’ll want to click the Install button, followed by Enable.
Close out of the Community Plugins modal, and you should still be in your Preferences. Click on Templater in the lefthand menu, and enter the Template Folder Location field with the directory location where you keep your templates.
After that, you can close out of Preferences. Everything in our Physical Object system should be ready to work!
Creating New Physical Object button
On your Physical Objects MOC page, the meta-bind-button code block should now be rendering as a real button. If you followed this tutorial to the letter, it should work out-of-the-box. But it probably won’t. So let’s re-create that button from scratch.
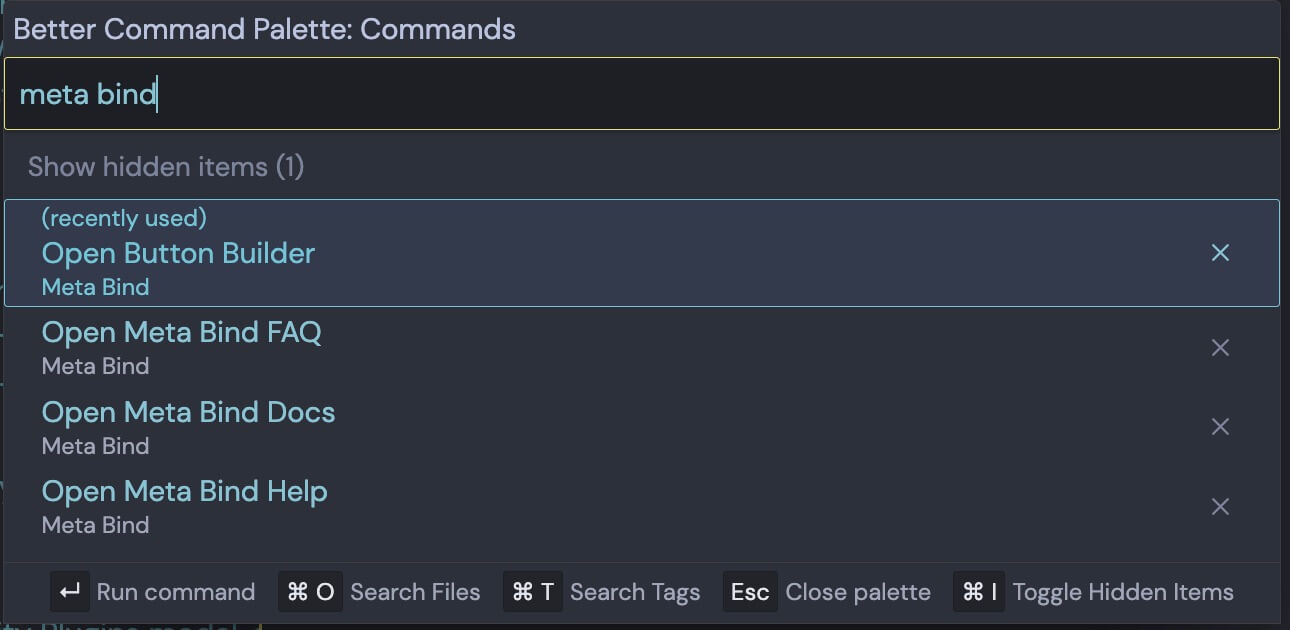
First, delete the entire meta-bind-button code block. Type Command-P to open the Obsidian Command Palette and type Meta Bind. Select Open Button Builder and press enter.
For the button’s name, type “New Physical Object.” Then, look for the Actions section and choose templaterCreateNote and select Add Action.
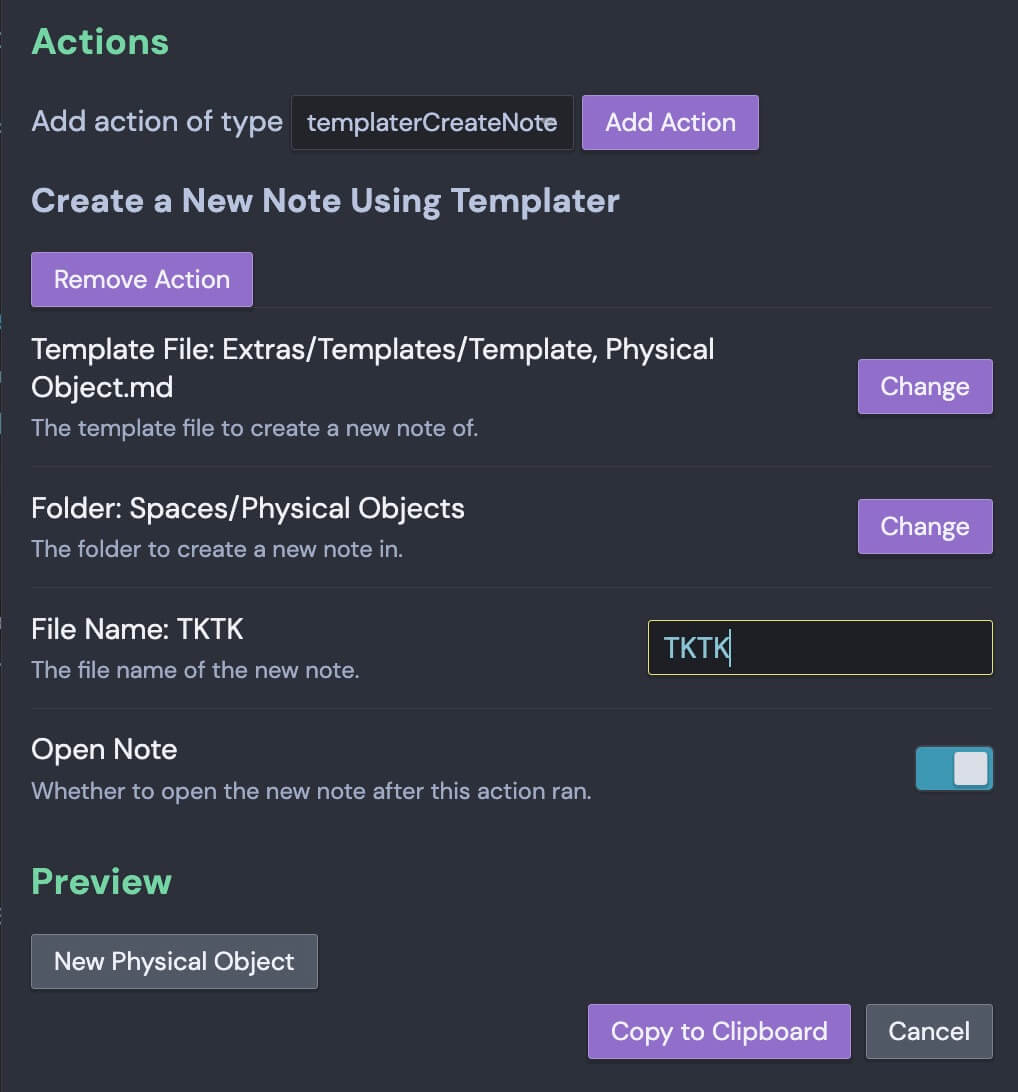
In the Template File field, choose the Physical Objects template file we just created: Template, Physical Object. For Folder, select the directory where you want these physical object notes to live—for me that’s Spaces/Physical Objects. For filename, I just use TKTK1.
Click Copy to Clipboard to close the Button Builder modal, and paste the code into your Physical Objects MOC note.
Click the button, and if everything was done correctly, it should be working! Congrats, you now have a Physical Object system in Obsidian.
Building out your Physical Objects system
Now that you have this new system in place, you may feel tempted to dump everything that you own into Obsidian. I’d actually encourage you not to do that. If you’re anything like me, it’s easy to get distracted by tasks that feel like work, but don’t actually make progress towards any actual big goals. For me, creating a digital inventory of all my physical objects falls into that category.
Plus, going slow will help you evaluate and customize the system for you.
Instead of trying to add everything to your vault all at once, pick a few specific categories that will have either immediate or near-term usefulness. For me, this meant adding in several pieces of furniture, including actual dimensions of each of these items. I also initially added several tech products, because the information was fairly easy to locate in my online shopping history, and model names/specs is useful information to have.
Once you get a baseline set on information in there, go about with other business. Eventually, you’ll buy a new item that will be perfect to add to the system. Or you’ll remember an existing item that you have, and will have a reason for wanting it to exist in your vault.
As you add each of these items one at a time, notice what information you’re adding, and what fields you’re leaving blank. Make tweaks to your template file as you go. Over time, make your system reflect the ways you actually use it, rather than the ways you aspire to use it.
Liked this post?
Check out my other Obsidian posts:
- My Obsidian Daily Note Template
- My Obsidian People Note Template
- My Obsidian Meeting Note Template
- Recalling Books You’ve Read, Made Easy
Prefer video content? Check out the above video tutorial version of this post. It shows you exactly how to set up your own Physical Object note template system.
If you’ve read this far, you might also really enjoy my free monthly newsletter. Each month, I share five cool new things I found. These can be products, articles, apps, movies, concepts, and anything else. Feel free to check out the archive to see if it’s something you might like, and subscribe to get each edition in your email.
In case you haven’t seen
TKTKbefore, it’s an abbreviation often used by writers as a way to quickly denote “I’ll come back to that” and keep writing. I picked it up during my years as a journalist and now use it all the time. ↩︎