By the end of this post, you’ll have your entire Obsidian vault backed up to Github for free, and have the option to schedule recurring backups either for free or using a method with a one-time $36 fee (the way I’m currently doing it).
This post is designed for a full range of technical experience, from those new to the command line to those with am already-colorful Github contributions graph.
I back everything up to Github in addition to Obsidian Sync (which is what keeps my Obsidian vaults in sync across two laptops, my iPad, and my iPhone). This Github backup is exactly that: a backup. It’s totally free and provides extra peace of mind that all my notes are safe from any accidents or unforeseen data-loss catastrophes.
The best thing about backing up your vault to Github is that it’s a set-it-and-forget-it process. Once you do the work to set this up the first time, you’ll never need to think about it again. It just works in the background, uploading all your notes to a private Github repository that you can review, access, or re-download at any time.
There are three steps we’ll take:
- Create two files: a sync script and a .gitignore document
- “Upload”1 your vault to Github
- Schedule recurring sync task (free and premium way)
Let’s walk through each step one at a time.
Create sync script
First, open a text editor (I use Sublime Text) and add the following code:
#!/bin/bash

gstatus=`git status --porcelain`

if [ ${#gstatus} -ne 0 ]
then

    git add --all
    git commit -m "Automated snaptop: $gstatus"
    git pull --rebase
    git push

fi
In case you’re curious, this script:
- Checks if there are any changes in your local git repository
- If there are changes, it stages all changes
- Commits these changes with a message that includes a summary of the changes
- Rebases any changes from the remote repository to ensure there are no conflicts
- Pushes the committed changes to the remote repository.
Save this file in your root Obsidian directory with the name sync (just the word sync. You don’t need to add an extension like .sh, .txt, or .md or anything else).
Next, we need to make this script executable. This lets our computer actually run this script.
This is going to involve the Terminal, but don’t worry if you don’t have much experience in the command line. Everything we’re doing is both straightforward and low risk.
Open the application named Terminal and navigate to your Obsidian Vault.
If you don’t know how to navigate in the terminal, type cd followed by a space, and the click-and-drag your Obsidian vault folder from Finder into the Terminal window. Return to the Terminal and press Return to navigate to that folder.
Once you’re in the correct directory, run this command to make sync executable:
chmod -x sync
Now there’s just one more file we need to make, which is the .gitignore file. This is going to explicitly state certain files that you do not want to sync to Github.
Things like DS_Store and other system files that are often in MacOS directories but that we don’t want on Github.
Back in your text editor, create a new file and copy/paste this:
# macOS system files
.DS_Store
.AppleDouble
.LSOverride

# Thumbnails
._*

# Files that might appear in the root of a volume
.DocumentRevisions-V100
.fseventsd
.Spotlight-V100
.TemporaryItems
.Trashes
.VolumeIcon.icns
.com.apple.timemachine.donotpresent

# Directories potentially created on remote AFP share
.AppleDB
.AppleDesktop
Network Trash Folder
Temporary Items
.apdisk
Save that file as .gitignore (yes, starting with a period) in the root directory of your Obsidian vault.
`.Obsidian/` to the very bottom of your gitignore file. I like backing up my settings, so I'm excluding that line.Now, you should have two new files in your root directory: sync and .gitignore
Next, let’s move all this to Github.
“Upload” your vault to Github
Next, we’re going to be using a command line application called Git in order to push (or upload) our vault to Github. It’s actually fairly straightforward.
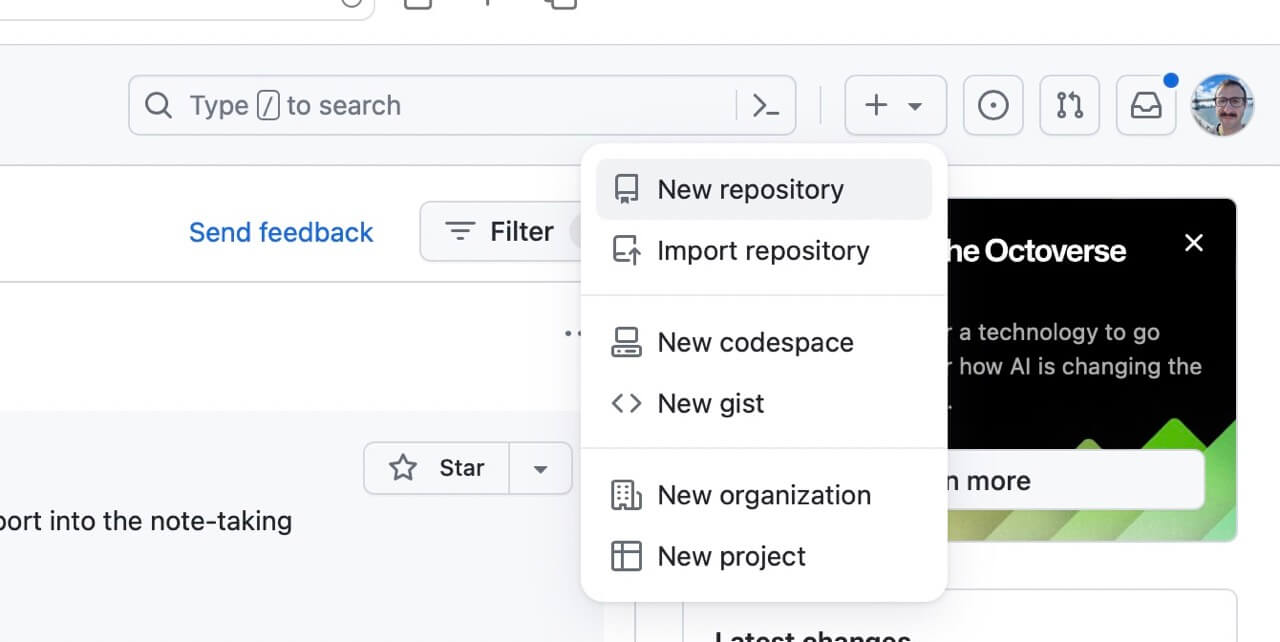
Sign up for a free Github account if you don’t have one yet. Then, at the top right, click the plus button and choose New Repository.
Choose a repository name (it can be anything you want) and make sure to change the repo visibility from Public to Private (unless you want all of your notes to be public).
Leave everything else as it is and press Create Repository.
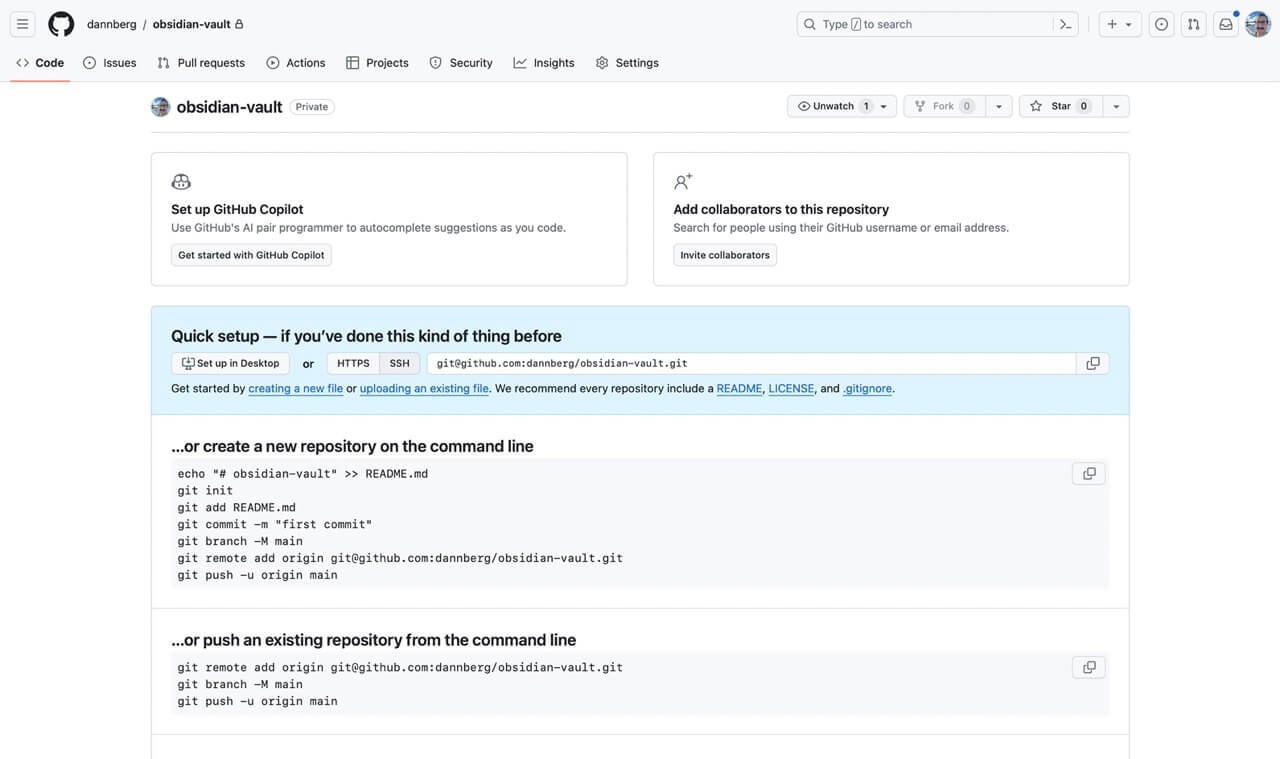
And just like that, we have an empty Github repository ready and waiting for our vault. You’ll be navigated to the repo itself, which (since it’s empty) will show instructions for uploading content. You can ignore that and just continue with these directions here.
Next, we need to use Git to send our vault to Github.
Going back to the Terminal, you should still be in the correct directory as long as you haven’t touched anything. If not, navigate back to your Obsidian vault in the Terminal.
Once you’re in that directory, type each of these following commands followed by Return:
git init
That initiates a new local git repository on your computer.
git add .
This adds your entire vault (excluding the files we added to the gitignore) to the local repository.
git commit -m "initial commit"
This readies your vault to be sent to Github, and adds a comment (“initial commit”).
This next line will be unique to your Github repo, so you’ll need to get it from Github. Look at your Repository’s instruction page for a line that starts with git remote add origin and copy that full line into the terminal. For me, it’s:
git remote add origin [email protected]:dannberg/obsidian-vault.git
Finally, let’s send everything to Github!
git push -u origin master
Go back to Github in your browser and refresh the page. If you did everything correct, that page of instructions should be replaced with your complete Obsidian vault.
Schedule recurring sync task
There are two ways I’m going to show you how to set up a recurring sync task so this backup task is both regular and automated. A paid way (the way I do it) and a free way (which I’ll explain, but you may need to do some additional troubleshooting).
The paid way to sync
The good news about “the paid way” is that is an application called Keyboard Maestro that’s just a $36 one-time cost. Plus, the app does way more than just running scripts on a schedule, so you get a ton of extra functionality if you can find uses. If you can afford it, I think this is the way you should go.
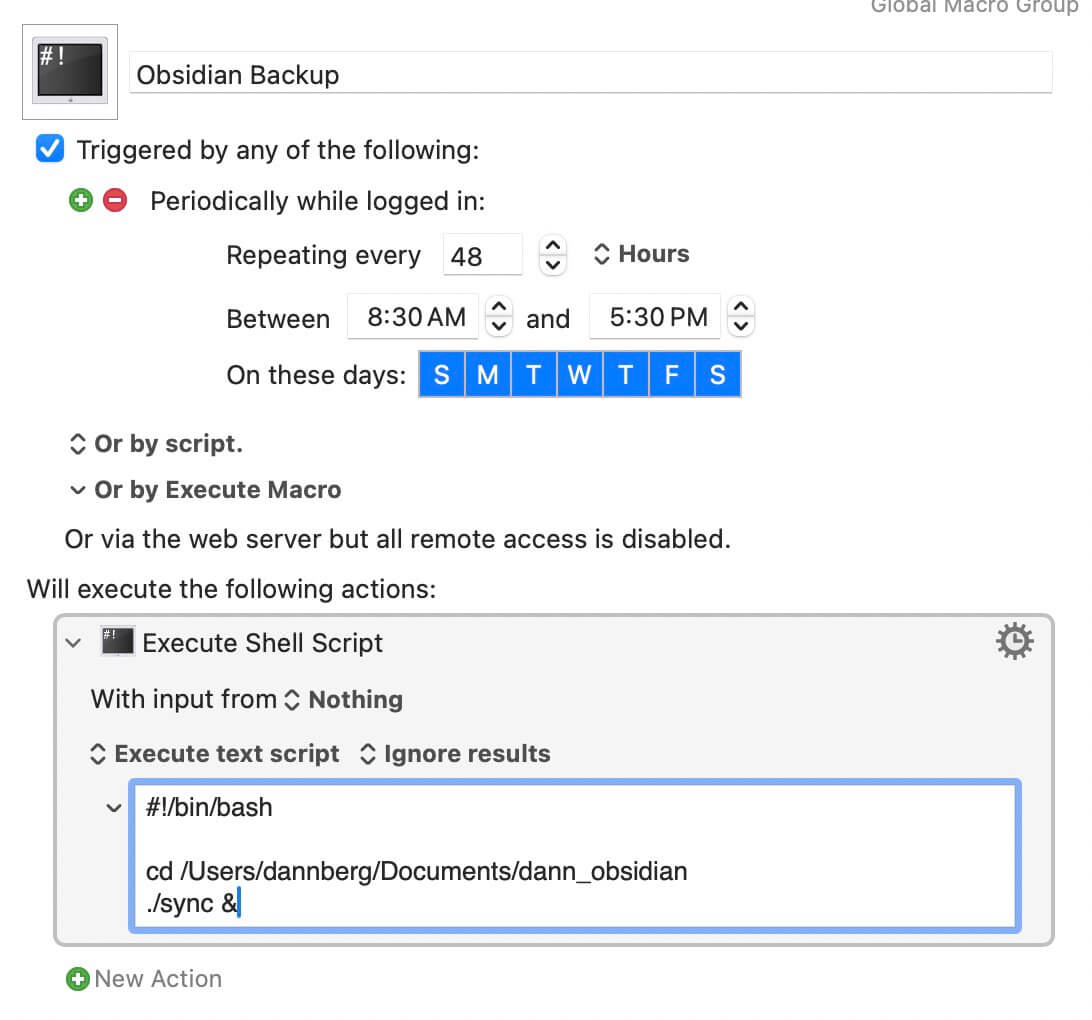
Once you have Keyboard Maestro, create a new macro and for the trigger, select Periodic Trigger. Choose how frequently you want this to run. For me, that’s repeating every 48 hours running sometime between 8:30am and 5:30pm on all seven days of the week.
Below, where it says “will execute the following actions,” press the New action button.
Find Execute Shell Script and click and drag it from the lefthand actions menu into the action block. There’s one default dropdown that we want to change: switch “Display results in a window” to “Ignore Results.”
You’ll need to modify this script, changing the path (the part after cd) to match your own Obsidian path.
#!/bin/bash

cd /Users/dannberg/Documents/dann_obsidian
./sync &
Again, replace /Users/dannberg/Documents/dann_obsidian with the actual path to your vault.
Hint: if you don’t know your path, go back to Terminal and verify that you’re still in the directory of your Obsidian vault. Then, type pwd (which stands for Print Working Directory) and press return. That will output the path to your vault, and you can copy and paste it into the script.
All this script does is navigates to your Obsidian vault and runs the sync script.
To test that everything is working, make some changes to your Obsidian vault and then click the Try button at the bottom of the window. Then, return to Github and refresh your repo.
If you’ve done everything correctly, you should see updated now for the directories that contain edited files.
The free way to sync
If you want to go the free route, you can use something called cron. Cron is a time-based job scheduler for Linux and Mac. It allows you to do (almost) exactly what we did above, all via the command line.
I imagine this statement will make many strangers (and also many close friends) seethe with anger, but I never really liked cron. Sure, it’s super powerful, but it’s also very manual. I can’t count the number of times I’ve thought I’ve set a cron job and it just didn’t run (or stopped running at sometime later), and figuring out what happened and then troubleshooting is just annoying. That’s why I prefer just paying $36 for Keyboard Maestro.
But maybe you, reader, are a cron master. Or, buying an app just it’s financially or philosophically viable for you right now. Here’s how to set it up.
Cron jobs are defined by writing a line in a specific format to a file called crontab.
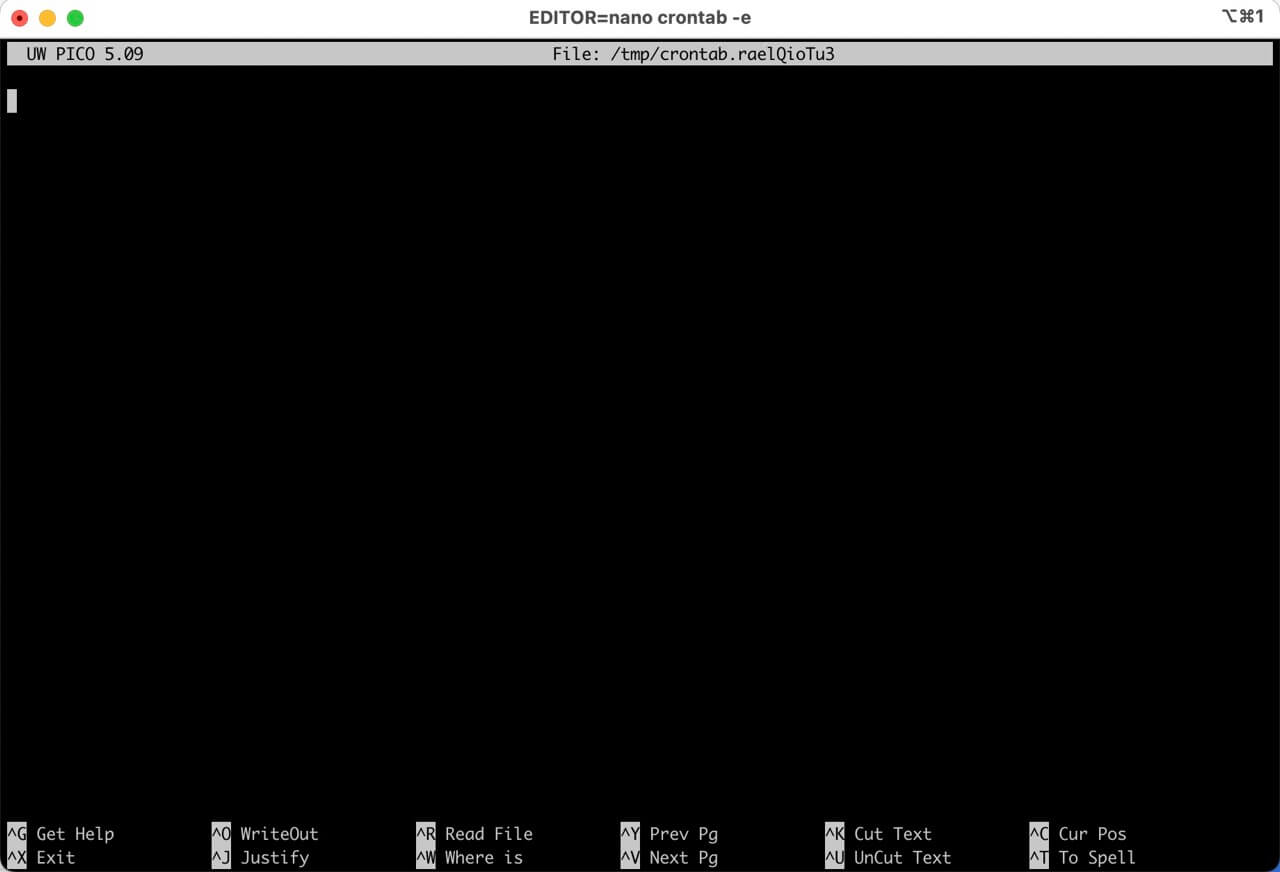
Let’s open crontab in a basic command line text editor called Nano:
EDITOR=nano crontab -e
Assuming you don’t yet have any other cron job defined, you’ll be greeted with a blank page.
Next, let’s define what your cron job command should look like. Let’s use this as a base:
0 10 */2 * * /Users/dannberg/Documents/dann_obsidian/sync
There are two sections you want to replace in this line. First, you’ll want to choose a schedule for this job to run. For me, that’s 0 10 */2 * *, which (in cron-speak) says to run the script at 10am every two days.
You can create your own cron-speak code with this handy CronMaker tool. Or, feel free to ask ChatGPT to write it for you.
Next, you want to replace the path with the actual path to your sync script. It will be the same directory path that we used before (after running the pwd command) but make sure you add sync at the end so that it actually runs your script.
To exit Nano, type control-X, then press Y to confirm you want to save the changes to crontab, and then press enter to save.
And that’s it! Your script will start running on the schedule you defined.
A note about cron: if your laptop (or any computer) is powered off or in a sleep/hibernation state at the time a cron job is scheduled to run, the job will not execute. There’s no notification and there’s no trying again later.
If that’s a concern, there are more advanced task schedulers that you can use, but that’s beyond the scope of this article.
The word “upload” is in quotes because the correct term is actually “push,” as in: “we’re going to push your vault to Github.” ↩︎