How Dann sets up new computer
By Dann Berg
Published or Updated on
 Photo from Usplash
What’s New (November 2024)
- Switched from Brave to Orion as my primary browser
- Add Proton Mail, ChatGPT, FreeTube, Slack, Discord, Plexamp, FindAnyFile, Hazel
- Add App Store apps: Amphetamine, Tailscale, Paprika, Deliveries
- Add Adobe Creative Cloud
- Remove: Garageband
- Add video conferencing audio improvement stack (Vocaster Hub, Loopback, Audio Hijack)
- Replace Mailplane with Edison Mail
- Replace Meeter witih MeetingBar
- Enable Show Volume in Menu Bar
- Simplify Github CLI setup
- Set Nano as default text editor for terminal
Over the years, I’ve tweaked and customized my laptop to perfection. Everything is in the perfect place, and everything works exactly how I want it to work. Which means every time I get a new laptop (either through work, or otherwise), there is a ton of small adjustments that need to be made before it really feels like mine.
Several years ago, I decided to document every single action I took when setting up a new laptop, in order to have a set of instructions for the next time. Then, I got into the habit of tweaking and adjusting this document every time I made a change to my setup.
I was recently setting up my old FullStory laptop as a personal computer, and I was reminded about how absolutely wonderful it is to have a document like this.
I’m sure there’s a way to automate this more (through dotfiles or some other automation template) but I enjoy doing everything by hand. Setting up a new laptop is not something I do very frequently (or I would spend more time trying to automate it), and it just feels fun for everything to start coming together piece-by-piece.
In this post, I’m documenting how I set up a new MacOS computer in 2023. I’m sharing this because 1) I thought others might find it interesting or useful and 2) it’ll be fun for me to look back on this post and see what’s changed/evolved.
Notes:
- Tasks are grouped by category rather than written chronologically1. This means that you may need to jump around a bit, rather than just work your way through from top to bottom.
- Many applications are going to require you to explicitly grant permissions. Each of these apps will make it clear during the install process, so I’ve omitted those details here.
- Some minor details may be obfuscated for security or privacy reasons.
- Some application settings are simply imported from backups. This article details the import instructions, but not the settings themselves.
Home Network Setup

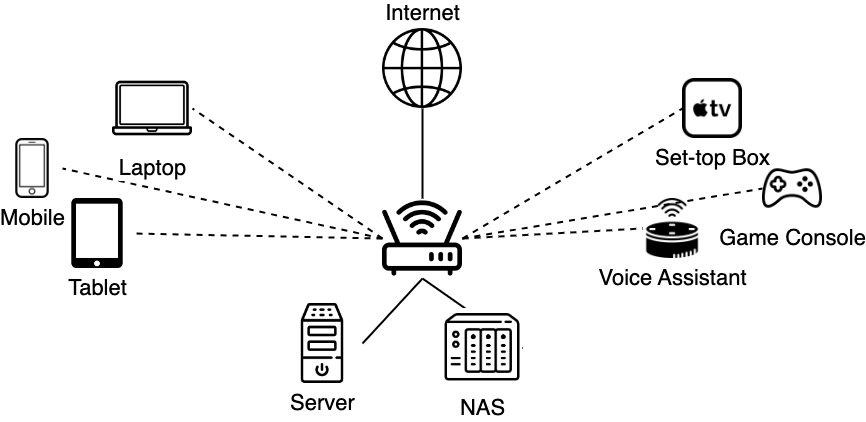
Before we begin, I wanted to touch on my home network setup. The important thing to note is that I have a server running headless Debian Linux and a Synology NAS for storage. Both these devices are backed up the the cloud.
All important files and documents are stored on the NAS (or in the cloud) and all important processes are running on the server. This means that there are no files that need to be transfered from one device to another — everything lives in central storage that can be accessed by any device on the network.
The only exception to this is a few application settings files, which are stored on the NAS and need to be imported to a new computer during setup. Those details are noted below.
Applications
There are two foundational apps that we’ll install first (browser and password manager), before jumping into apps categorized by licensing and destination.
Browser - Orion
Install Orion Browser and perform the following actions:
- Copy over application settings from existing comptuer (located
~/Library/Application\ Support/Orion) - Change Bookmark Bar setting to only show icon
- Log into Kagi as primary search engine
- Go to Settings -> Tabs -> Disable
Always show website titles in tabs
Browser (Secondary) - Brave
Install Brave Browser to use as secondary browser (in addition to Safari)
- Set up Sync to import existing extensions/bookmarks/settings/history
Password Manger - 1Password
Install 1Password 8 from website (not App Store)
- Authenticate with existing vault
- Install Browser Plugins (Orion, Brave, Safari)
- Enable Incognito
- Set up Keyboard Shortcuts
- Show Quick Access:
Command-Shift-. - Autofill:
Command-Shift-Space
- Show Quick Access:
Standalone Apps
Software Licenses in 1Password
- Bartender
- Hide Menu Bar apps as they’re installed
- Hyperkey
- Set capslock to Hyper Key (include Shift in hyper key)
- Little Snitch
- Retrobatch
- Downie 4
- Sublime Text
- Help -> Install Package Control
- Settings > Browse Packages. Quit Sublime Text and copy over
Packagesfrom NAS backup. - Change defaults of all text files to open in Sublime Text
- Alfred
- Connect to settings backup in Dropbox
- Enable clipboard manager
- Disable MacOS default Spotlight shortcut
- System Preferences > Keyboard > Keyboard Shortcuts > Spotlight (left menu) > Uncheck shortcuts
- Set Alfred to
Command-Space
- Adobe Creative Cloud
- Photoshop
- Adobe Premiere
- Adobe After Effects
- Adobe Lightroom
- Keyboard Maestro
- Enable Sync in Preferences, file saved in iCloud Drive
- Make sure
Obsidian Sync to Githubis working
- iStat Menu
- CPU, Battery, Clock (display seconds)
- Disable MacOS default time and battery
- Disable default battery in Battery System Preferences
- Transmit 5
- Import connection settings for Namecheap hosting & dedicated server
- Hazel
- Sync Download folder rules from iCloud Drive
Syncfolder
- Sync Download folder rules from iCloud Drive
- Photomosh
- Current up-to-date link from Gumroad
- Cleanshot X
- Video conferencing audio improvement stack
No software license
- iTerm2
- Preferences -> General -> Preferences -> Load preferences from a custom folder or URL -> Dropbox folder
- Preferences -> Profiles: select loaded profile
- Install homebrew:
/bin/bash -c "$(curl -fsSL https://raw.githubusercontent.com/Homebrew/install/HEAD/install.sh)" - Install ZSH:
brew install zsh - Install Oh-My-ZSH:
sh -c "$(curl -fsSL https://raw.githubusercontent.com/robbyrussell/oh-my-zsh/master/tools/install.sh)"
- VLC
- Preferences: Hotkeys
Short jumpleft/right arrows andMedium jumpto up/down arrows
- Preferences: Hotkeys
- Skyfonts
- Connect
fonts.comandMyFonts - Settings -> Google Fonts -> Browse Google Fonts -> Check Add Entire Family -> Install
- Roboto
- Fira Sans
- Montserrat
- Rokkitt
- Other Fonts, from NAS
- Source Code
- Novecento Sans
- Connect
- FreeTube
- ProtonMail - Primary email
- Edison Mail - Secondary email
- Set to Full Screen view
- ProtonVPN
- ChatGPT (Apple Silicon Only)
- Dropbox
- Zoom
- Slack
- Discord
- Steam
- PlexAmp
- Handbrake
- Obsidian
- Vault located in
Documentsfilter, sync through Obsidian Sync
- Vault located in
- Find Any File
Install from App Store
- Xcode
- Apple’s Developer Tools:
xcode-select --install
- Apple’s Developer Tools:
- Fantastical
- Use Apple ID to log in
- Generate Apple app-specific password
- Disable notifications from Apple Calendar in System Preferences > Notifications
- Settings > General > Remove keyboard shortcut for
Mini window keyboard shortcut - Settings > Advanced > Open Maps in Google Maps
- The Unarchiver
- Set as default for Zip
- Magnet
- Change Left Half to
Hyper Key + <- - Change Right Half to
Hyper Key + ->
- Change Left Half to
- Things 3
- Make sure the Fantastical keyboard shortcut has been removed (see above)
- New To Do:
Control-Space - New To Do from Website (requires helper install):
Control-Option-Space
- Amphetamine
- Launch at Login
- Keep display on during working hours
- Filebot
- Right-click on Match, navigate to Format
- TV:
/Volumes/Media/{plex} - Movies:
/Volumes/Media/{plex}-{vf}
- TV:
- Right-click on Match, navigate to Format
- Tot
- CarrotWeather
- Reeder 5
- Connect to self-hosted FreshRSS feed aggregator
- MeetingBar
- Deliveries
- Tailscale
- Paprika
MacOS
System Preferences
- Set Orion as default web browser
- System Preferences - Desktop & Dock - Default Web Browser
- Sign into Google account in Apple’s System Preferences
- Sync calendar, nothing else
- Set up touchpad
- Enable Tap to Click2
- Enable Three-finger drag
- Accessibility -> Pointer Control -> Trackpad Options -> Enable Dragging: Three Finger Drag
- Enable Mission Control gesture
- Trackpad -> More Gestures - Enable Mission Control with Swipe up with four fingers
- Disable Chrome Back/Forward with two-finger swipe by opening Terminal and entering:
defaults write com.brave.Browser AppleEnableSwipeNavigateWithScrolls -bool FALSE
- Set up mouse
- Connect Bluetooth Mouse
- Set speed to max
- Set up keyboard
- Connect Bluetooth Keyboard
- Laptop Touchbar (if applicable)
- Shows: Expanded control strip
- Edit Touchbar, drag off Siri button
- Set up Apple Watch to unlock laptop
- Touch ID & Password > Enable Apple Watch
- Enable Text message forwarding (phone to laptop Messages app)
- On iPhone (must be signed into same iCloud account): Settings > Messages > Text Message Forwarding > Enable new computer
- Disable Siri
- Show Volume in Menu Bar (Control Center)
- Desktop & Dock
- Scroll to Mission Control section, uncheck
Automatically rearrange Spaces based on most recent use - Click Hot Corners, set bottom right to Lock Screen
- Scroll to Mission Control section, uncheck
- Customize the Keyboard shortcut for “Paste and Match Style” to be
Command-Shift-V- In System Preferences, click Keyboard then the
Keyboard Shortcuts...button. - Go to App Shortcuts on the left menu and click the plus to add.
- In the “Menu Title” field, enter “
Paste and Match Style” (including capitalization and spaces). In the “Keyboard Shortcut” field, typeCommand-Shift-V.
- In System Preferences, click Keyboard then the
Finder Settings
- View > Show Path Bar
- View > Show Status Bar
- Finder Menu -> Settings ->
- Advanced -> Show all filename extensions
- Advanced -> When performing a search: Search the current folder
- Sidebar
- Uncheck Recents, Airdrop, Shared, Recent Tags
- Right-click on tool bar to customize toolbar3
- Show all hidden files in Finder
- In terminal type:
defaults write com.apple.Finder AppleShowAllFiles true - Restart Finder:
killall Finder
- In terminal type:
- Connect to Synology NAS
afp://192.168.1.[XXX]- Login/Pass are in 1Password
- Go to Folder
/Volumesand drag it over into sidebar
- Connect Airpods Pro and Airpods Max.
- Go to Settings > Bluetooth and change Connect Automatically to Connect when this device last used
Developer Settings
- Set up Github CLI
brew install ghgh auth login- Login in browser
- Create
Codefolder in/Users/dannberg/- In terminal
lsintoCodeandgit clone https://github.com/dannberg/dannb-org.gitto pull down that directory from GitHub. - Pull down other desired repos
- In terminal
- SSH Key
- Generate new SSH key
- Add SSH key to GitHub
- Add ssh key to home server for passwordless login
ssh-copy-id [email protected].[XXX]
- Install Homebrew
/bin/bash -c "$(curl -fsSL https://raw.githubusercontent.com/Homebrew/install/master/install.sh)"
- Install Hugo
brew install hugo
- Set Nano as default text editor, add email
git config --global core.editor "nano"git config --global user.email "[email]"
For example, the password manager 1Password is one of the first items you need to download, as it stores relevant information (login info, software licenses) for the rest of the process. In this document, however, 1Password is in the section
Install from App Storerather than at the top of the post. It’s organized this way to make it easier to pick-and-choose piece you want to take for your own process, rather than optimizing for lifting the entire process for yourself. ↩︎Tap-to-click is vastly superior to click-to-click. Fight me. ↩︎
Here’s how I like my Finder Toolbar:
 ↩︎
↩︎